Bundle Stylesheets and Add LiveReload With Rollup
Learn how to use the JavaScript bundler Rollup to process stylesheets using PostCSS and rebuild & reload files when changes are made in this tutorial.
In the first part of this series, we walked through the process of setting up Rollup as a front-end build tool for JavaScript.
This article covers parts two and three.
First, we’ll continue working on that project in Part II to add support for stylesheet processing through Rollup, using PostCSS to run some transforms and allow us to use syntactic sugar like simpler variable syntax and nested rules.
After that, we’ll wrap up with Part III, where we’ll add file watching and live reloading to the project so we don’t have to manually regenerate the bundle whenever files are changed.
Prerequisites
- We’ll be continuing with the project we started last week, so if you haven’t gone through that part yet, it’s probably worth a look.
Series Navigation
- Part I: How to Use Rollup to Process and Bundle JavaScript Files
- Part II: How to Use Rollup to Process and Bundle Stylesheets <— you are here
Part II: How to Use Rollup.js for Your Next Project: PostCSS
Another part of Rollup that’s nice, depending on how your project is set up, is that you can easily process CSS and inject it into the head of the document.
On the plus side, this keeps all your build steps in one place, which keeps the complexity down in our development process — that’s a big help, especially if we’re working on a team.
But on the down side, we’re making our stylesheets rely on JavaScript, and creating a brief flicker of unstyled HTML before the styles are injected. So this approach may not make sense for some projects, and should be weighed against approaches like using PostCSS separately.
Since this article is about Rollup, though: fuck it. Let’s use Rollup!
Step 0: Load the stylesheet in main.js.
This is a little funky if you’ve never used a build tool before, but stick with me. To use our styles in the document, we’re not going to use a <link> tag like we normally would; instead, we’re going to use an import statement in main.min.js.
Right at the top of src/scripts/main.js, load the stylesheet:
// Import styles (automatically injected into <head>).import '../styles/main.css';
// Import a couple modules for testing.import { sayHelloTo } from './modules/mod1';import addArray from './modules/mod2';
// Import a logger for easier debugging.import debug from 'debug';const log = debug('app:log');
// The logger should only be disabled if we’re not in production.if (ENV !== 'production') {
  // Enable the logger.  debug.enable('*');  log('Logging is enabled!');} else {  debug.disable();}
// Run some functions from our imported modules.const result1 = sayHelloTo('Jason');const result2 = addArray([1, 2, 3, 4]);
// Print the results on the page.const printTarget = document.getElementsByClassName('debug__output')[0];
printTarget.innerText = `sayHelloTo('Jason') => ${result1}\n\n`;printTarget.innerText += `addArray([1, 2, 3, 4]) => ${result2}`;
Step 1: Install PostCSS as a Rollup plugin.
The first thing we need is Rollup’s PostCSS plugin, so install that with the following:
npm install --save-dev rollup-plugin-postcssStep 2: Update rollup.config.js.
Next, let’s add the plugin to our rollup.config.js:
// Rollup pluginsimport babel from 'rollup-plugin-babel';import eslint from 'rollup-plugin-eslint';import resolve from 'rollup-plugin-node-resolve';import commonjs from 'rollup-plugin-commonjs';import replace from 'rollup-plugin-replace';import uglify from 'rollup-plugin-uglify';import postcss from 'rollup-plugin-postcss';
export default {  entry: 'src/scripts/main.js',  dest: 'build/js/main.min.js',  format: 'iife',  sourceMap: 'inline',  plugins: [    postcss({      extensions: [ '.css' ],    }),    resolve({      jsnext: true,      main: true,      browser: true,    }),    commonjs(),    eslint({      exclude: [        'src/styles/**',      ]    }),    babel({      exclude: 'node_modules/**',    }),    replace({      ENV: JSON.stringify(process.env.NODE_ENV || 'development'),    }),    (process.env.NODE_ENV === 'production' && uglify()),  ],};
Take a look at the generated bundle.
Now that we’re able to process the stylesheet, we can regenerate the bundle and see how this all works.
Run ./node_modules/.bin/rollup -c, then look at the generated bundle at build/js/main.min.js, right near the top. You’ll see a new function called __$styleInject():
function __$styleInject(css) { css = css || ''; var head = document.head || document.getElementsByTagName('head')[0]; var style = document.createElement('style'); style.type = 'text/css'; if (style.styleSheet) { style.styleSheet.cssText = css; } else { style.appendChild(document.createTextNode(css)); } head.appendChild(style);}__$styleInject('/* Styles omitted for brevity... */');In a nutshell, this function creates a <style> element, sets the stylesheet as its content, and appends that to the document’s <head>.
Just below the function declaration, we can see that it’s called with the styles output by PostCSS. Pretty snazzy, right?
Except right now, those styles aren’t actually being processed; PostCSS is just passing our stylesheet straight across. So let’s add the PostCSS plugins we need to make our stylesheet work in our target browsers.
Step 3: Install the necessary PostCSS plugins.
I love PostCSS. I started out in the LESS camp, found myself more or less forced into the Sass camp when everyone abandoned LESS, and then was extremely happy to learn that PostCSS existed.
I like it because it gives me access to the parts of LESS and Sass that I liked — nesting, simple variables — and doesn’t open me up to the parts of LESS and Sass that I think were tempting and dangerous,1 like logical operators.
One of the things that I like most about it is the use of plugins, rather than an overarching language construct called “PostCSS”. We can choose only the features we’ll actually use — and more importantly, we can leave out the features we don’t want used.
So in our project, we’ll only be using four plugins — two for syntactic sugar, one to support new CSS features in older browsers, and one to compress and minify the resulting stylesheet:
postcss-simple-vars— This allows the use of Sass-style variables (e.g.$myColor: #fff;, used ascolor: $myColor;) instead of the more verbose CSS syntax (e.g.:root { --myColor: #fff; }, used ascolor: var(--myColor);). This is purely preferential; I like the shorter syntax better.postcss-nested— This allows rules to be nested. I actually don’t use this to nest rules; I use it as a shortcut for creating BEM-friendly selectors and grouping my blocks, elements, and modifiers into single CSS blocks.postcss-cssnext— This is a bundle of plugins that enables the most current CSS syntax (according to the latest CSS specs), transpiling it to work, even in older browsers that don’t support the new features.cssnano— This compresses and minifies the CSS output. This is to CSS what UglifyJS is to JavaScript.
To install these plugins, use this command:
npm install --save-dev postcss-simple-vars postcss-nested postcss-cssnext cssnanoStep 4: Update rollup.config.js.
Next, let’s include our PostCSS plugins in rollup.config.js by adding a plugins property to the postcss configuration object:
// Rollup pluginsimport babel from 'rollup-plugin-babel';import eslint from 'rollup-plugin-eslint';import resolve from 'rollup-plugin-node-resolve';import commonjs from 'rollup-plugin-commonjs';import replace from 'rollup-plugin-replace';import uglify from 'rollup-plugin-uglify';import postcss from 'rollup-plugin-postcss';
// PostCSS pluginsimport simplevars from 'postcss-simple-vars';import nested from 'postcss-nested';import cssnext from 'postcss-cssnext';import cssnano from 'cssnano';
export default { entry: 'src/scripts/main.js', dest: 'build/js/main.min.js', format: 'iife', sourceMap: 'inline', plugins: [ postcss({ plugins: [ simplevars(), nested(), cssnext({ warnForDuplicates: false, }), cssnano(), ], extensions: [ '.css' ], }), resolve({ jsnext: true, main: true, browser: true, }), commonjs(), eslint({ exclude: [ 'src/styles/**', ] }), babel({ exclude: 'node_modules/**', }), replace({ ENV: JSON.stringify(process.env.NODE_ENV || 'development'), }), (process.env.NODE_ENV === 'production' && uglify()), ],};Check the output in the <head>.
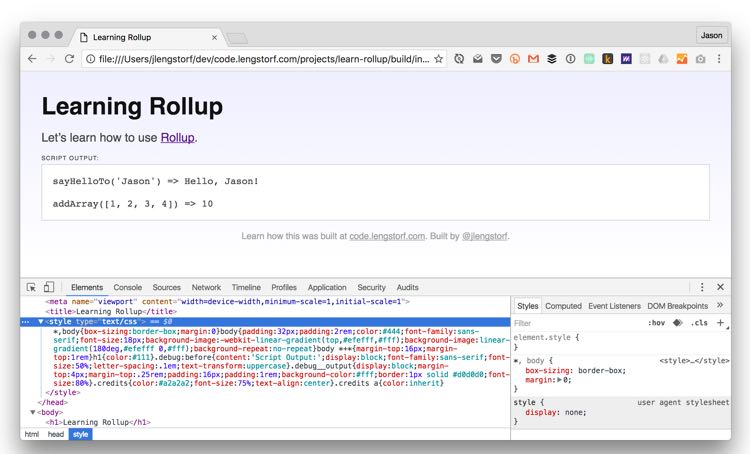
With the plugins installed, we can rebuild our bundle (./node_modules/.bin/rollup -c) and open build/index.html in our browser. We’ll see that the page is now styled, and if we inspect the document we can see the stylesheet was injected in the head, compressed and minified and with all the vendor prefixes and other goodies we expected from PostCSS:

Great! So now we have a pretty solid build process: our JavaScript is bundled, unused code is removed, and the output is compressed and minified, and our stylesheets are processed by PostCSS and injected into the head.
However, it’s still kind of a pain in the ass to have to manually rebuild the bundle every time we make a change. So in the next part, we’ll have Rollup watch our files for changes and reload the browser whenever a file is changed.
Part III: How to Use Rollup.js for Your Next Project: LiveReload
At this point, our project is successfully bundling JavaScript and stylesheets, but it’s still a manual process. And since every manual step in a process is a higher risk for failure than an automated step — and because it’s a pain in the ass to have to run ./node_modules/.bin/rollup -c every time we change a file — we want to make rebuilding the bundle automatic.
Step 0: Add a watch plugin to Rollup.
A common development tool when working with Node.js is a watcher. This may be familiar if you’ve worked with webpack, Grunt, Gulp, and other build tools in the past.
A watcher is a process that runs while you work on a project, and when you change files in any of the folders it’s monitoring, it triggers an action. In the case of build tools, the most common action is to trigger a rebuild.
In our project, we want to watch the src/ directory for any file changes, and when changes are detected we want to trigger a new bundle creation from Rollup.
To do that, we’ll use the rollup-watch plugin, which is a little different from the other Rollup plugins we’ve used so far — but more on that in a bit. Let’s start by installing the plugin:
npm install --save-dev rollup-watchStep 1: Run Rollup with the --watch flag.
The difference between rollup-watch and other Rollup plugins is that we don’t have to make any changes to rollup.config.js in order to use it.
Instead, we add a flag to our terminal command:
# Run Rollup with the watch plugin enabled./node_modules/.bin/rollup -c --watchAfter running the command, we see a different output in the console:
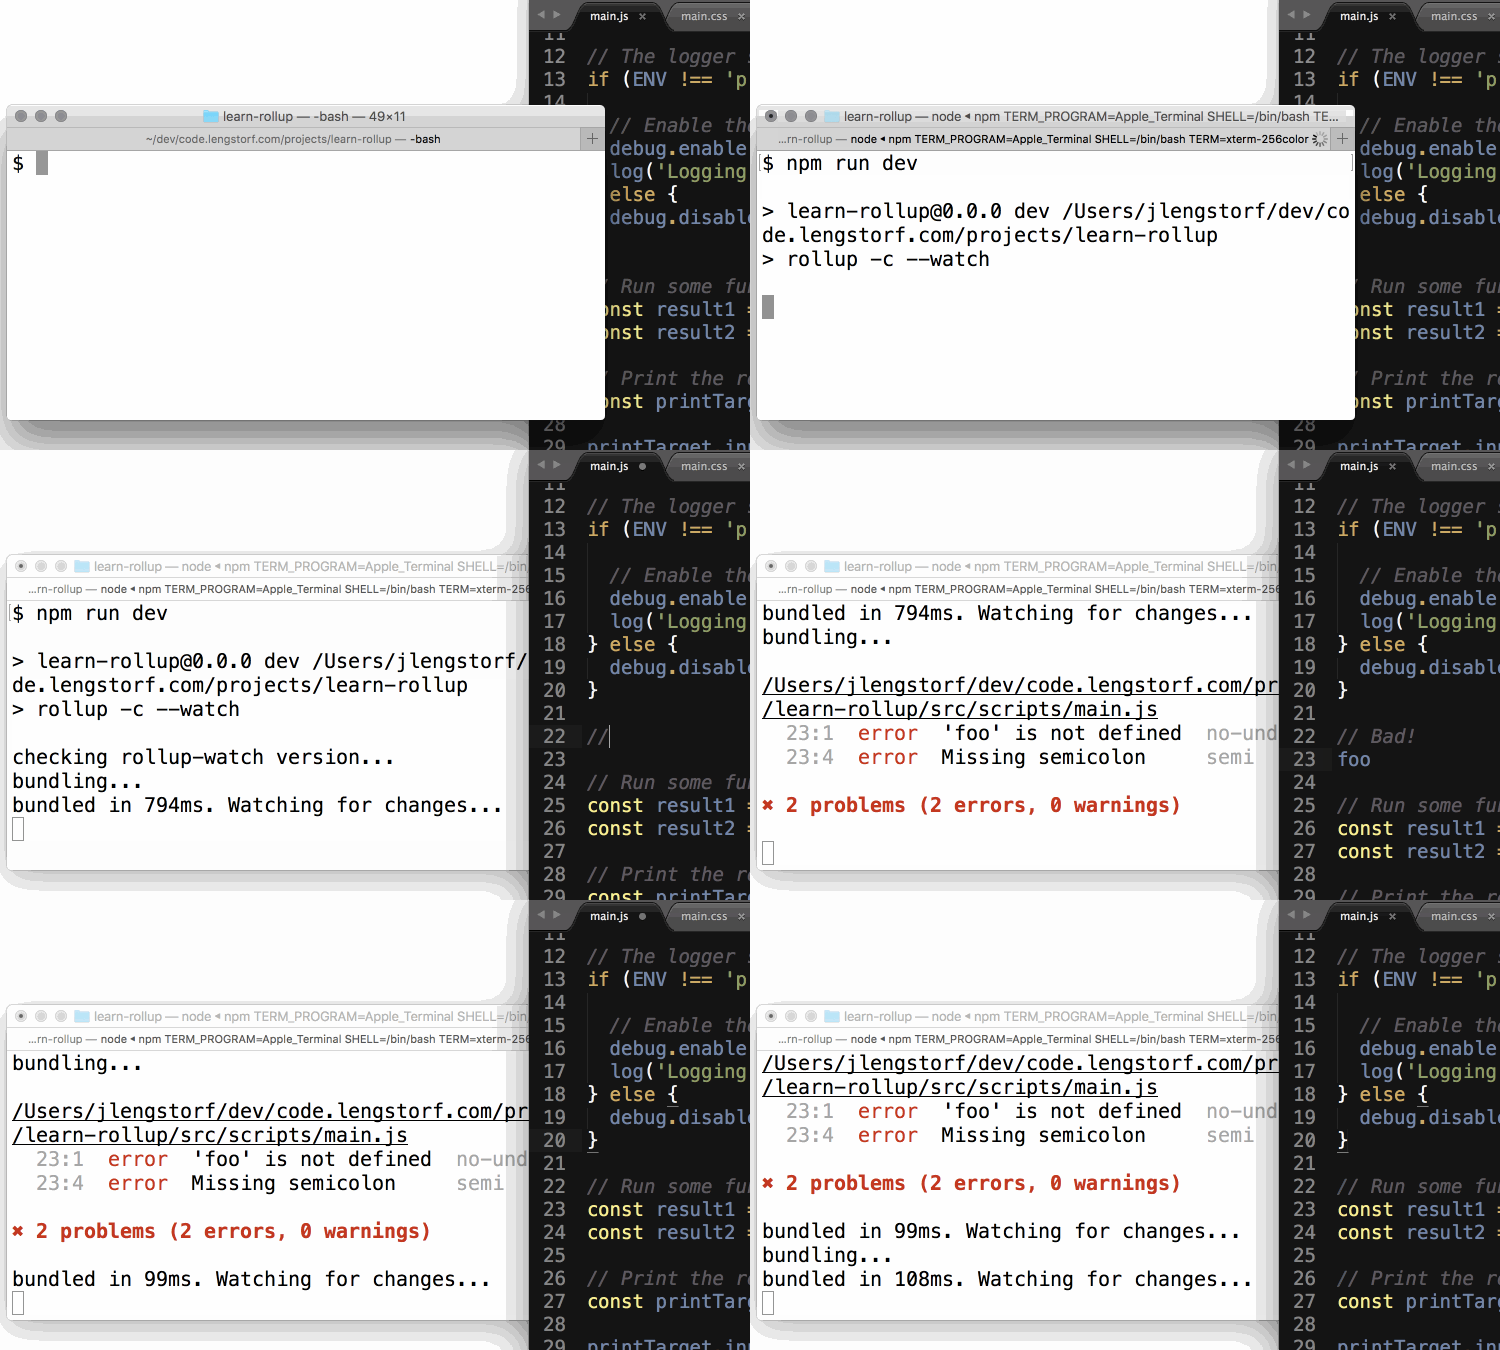
$ ./node_modules/.bin/rollup -c --watchchecking rollup-watch version...bundling...bundled in 949ms. Watching for changes...The process stays active, and it’s now watching for changes.
So if we make a small change to src/main.js — say adding a comment — as soon as we save it a new bundle is generated.

This is a big timesaver in development, but we can take it a step further. Right now we still have to refresh the browser to see the updated bundle — so let’s add a tool to refresh the browser automatically when our bundle is updated.
Step 2: Install LiveReload to refresh the browser automatically.
A common tool for speeding up development is LiveReload. This is a process that runs in the background and tells the browser to refresh whenever a file it’s watching is changed.
To start, we need to install the plugin:
npm install --save-dev livereloadStep 3: Inject the LiveReload script into the project.
Before LiveReload can work, we need to include a script in our page that talks to the LiveReload server.
Since this is only required in development, we’re going to take advantage of our environment variables to only inject the script if we’re not in production mode.
In src/main.js, add the following:
// Import styles (automatically injected into <head>).import '../styles/main.css';
// Import a couple modules for testing.import { sayHelloTo } from './modules/mod1';import addArray from './modules/mod2';
// Import a logger for easier debugging.import debug from 'debug';const log = debug('app:log');
// The logger should only be disabled if we’re not in production.if (ENV !== 'production') {
  // Enable the logger.  debug.enable('*');  log('Logging is enabled!');
  // Enable LiveReload  document.write(    '<script src="http://' + (location.host || 'localhost').split(':')[0] +    ':35729/livereload.js?snipver=1"></' + 'script>'  );} else {  debug.disable();}
// Run some functions from our imported modules.const result1 = sayHelloTo('Jason');const result2 = addArray([1, 2, 3, 4]);
// Print the results on the page.const printTarget = document.getElementsByClassName('debug__output')[0];
printTarget.innerText = `sayHelloTo('Jason') => ${result1}\n\n`;printTarget.innerText += `addArray([1, 2, 3, 4]) => ${result2}`;
Save the file once you’ve made the changes, and now we’re ready to try it out.
Step 4: Run LiveReload.
With LiveReload installed and the script injected into our document, we can fire it up to watch our build/ directory:
./node_modules/.bin/livereload 'build/'This results in output similar to the following:
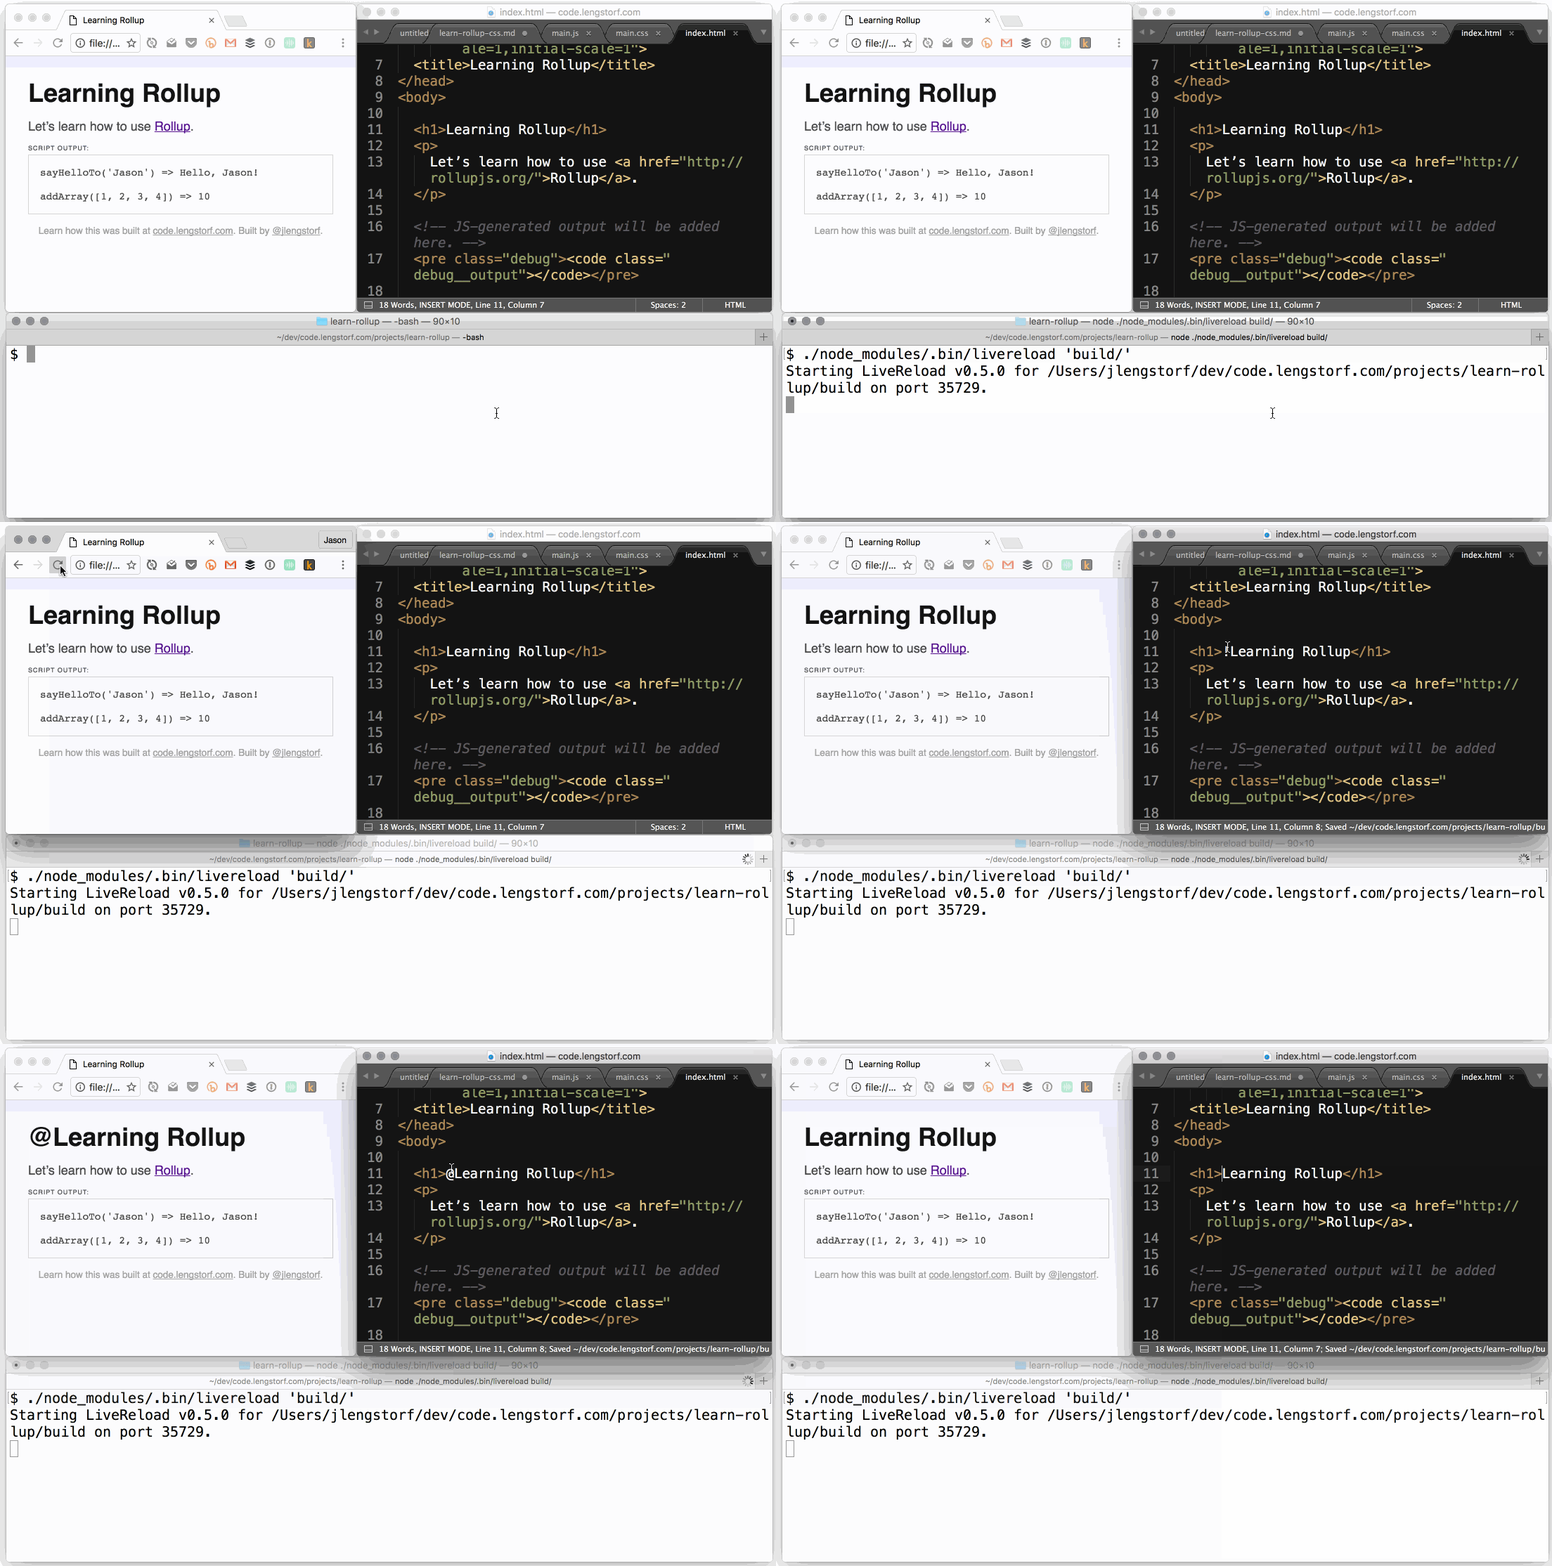
$ ./node_modules/.bin/livereload 'build/'Starting LiveReload v0.5.0 for /Users/jlengstorf/dev/code.lengstorf.com/projects/learn-rollup/build on port 35729.And if we open our browser to view build/index.html — make sure to refresh the page after starting LiveReload to ensure the socket connection is active — we can see that making a change to build/index.html will automatically reload the browser and show us our changes:

This is great, but we’re still a little stuck: right now, we can only get Rollup’s watch function or LiveReload running unless we open multiple terminal sessions. That’s not ideal. In the next two steps, we’ll create a workaround for that.
Step 5: Use package.json scripts to simplify startup.
So far in this tutorial, we’ve had to type the full path to the rollup script, which — I’m sure you’ve noticed by now — is a pain in the ass.
Because of this, and because the tool we’ll be using to run watch and LiveReload at the same time, we’re going to add both the rollup command and the livereload command as scripts in package.json.
Open package.json — it’s in the root of the learn-rollup/ project directory. Inside, you should see the following:
{ "name": "learn-rollup", "version": "0.0.0", "description": "This is an example project to accompany a tutorial on using Rollup.", "main": "build/js/main.min.js", "scripts": { "test": "echo \"Error: no test specified\" && exit 1" }, "repository": { "type": "git", "url": "git+ssh://git@github.com/jlengstorf/learn-rollup.git" }, "author": "Jason Lengstorf <jason@lengstorf.com> (@jlengstorf)", "license": "ISC", "bugs": { "url": "https://github.com/jlengstorf/learn-rollup/issues" }, "homepage": "https://github.com/jlengstorf/learn-rollup#readme", "devDependencies": { "babel-preset-es2015-rollup": "^1.2.0", "cssnano": "^3.7.4", "livereload": "^0.5.0", "npm-run-all": "^3.0.0", "postcss-cssnext": "^2.7.0", "postcss-nested": "^1.0.0", "postcss-simple-vars": "^3.0.0", "rollup": "^0.34.9", "rollup-plugin-babel": "^2.6.1", "rollup-plugin-commonjs": "^3.3.1", "rollup-plugin-eslint": "^2.0.2", "rollup-plugin-node-resolve": "^2.0.0", "rollup-plugin-postcss": "^0.1.1", "rollup-plugin-replace": "^1.1.1", "rollup-plugin-uglify": "^1.0.1", "rollup-watch": "^2.5.0" }, "dependencies": { "debug": "^2.2.0" }}See that scripts property? We’re going to add two new ones:
- A script to run our Rollup bundle generation command
- A script to turn on LiveReload
Add the following to package.json:
{ "name": "learn-rollup", "version": "0.0.0", "description": "This is an example project to accompany a tutorial on using Rollup.", "main": "build/js/main.min.js", "scripts": { "dev": "rollup -c --watch", "reload": "livereload 'build/'", "test": "echo \"Error: no test specified\" && exit 1" }, "repository": { "type": "git", "url": "git+ssh://git@github.com/jlengstorf/learn-rollup.git" }, "author": "Jason Lengstorf <jason@lengstorf.com> (@jlengstorf)", "license": "ISC", "bugs": { "url": "https://github.com/jlengstorf/learn-rollup/issues" }, "homepage": "https://github.com/jlengstorf/learn-rollup#readme", "devDependencies": { "babel-preset-es2015-rollup": "^1.2.0", "cssnano": "^3.7.4", "livereload": "^0.5.0", "npm-run-all": "^3.0.0", "postcss-cssnext": "^2.7.0", "postcss-nested": "^1.0.0", "postcss-simple-vars": "^3.0.0", "rollup": "^0.34.9", "rollup-plugin-babel": "^2.6.1", "rollup-plugin-commonjs": "^3.3.1", "rollup-plugin-eslint": "^2.0.2", "rollup-plugin-node-resolve": "^2.0.0", "rollup-plugin-postcss": "^0.1.1", "rollup-plugin-replace": "^1.1.1", "rollup-plugin-uglify": "^1.0.1", "rollup-watch": "^2.5.0" }, "dependencies": { "debug": "^2.2.0" }}These scripts allow us to use a shortcut for executing the script of our choice.
To run Rollup, we can now use npm run dev.
To run LiveReload, we can use npm run reload.
All that’s left now is to get them both running together.
Step 6: Install a tool to run the watcher and LiveReload in parallel.
In order to get both Rollup and LiveReload working at the same time, we’re going to use a utility called npm-run-all.
This is a powerful tool, so we won’t talk about everything it can do. What we’re using it for is its ability to run scripts in parallel — meaning both run at the same time inside the same terminal session.
Start by installing npm-run-all:
npm install --save-dev npm-run-allNext, we need to add one more script to package.json that calls npm-run-all. In the scripts block, add the following (note that I’ve left out most of the file for brevity):
"scripts": { "dev": "rollup -c --watch", "reload": "livereload 'build/' -d", "watch": "npm-run-all --parallel reload dev", "test": "echo \"Error: no test specified\" && exit 1"}Save your changes, then go to the terminal. We’re ready for the last step!
Step 7: Run the final watch script.
That’s it. We did it.
In your terminal, run the following:
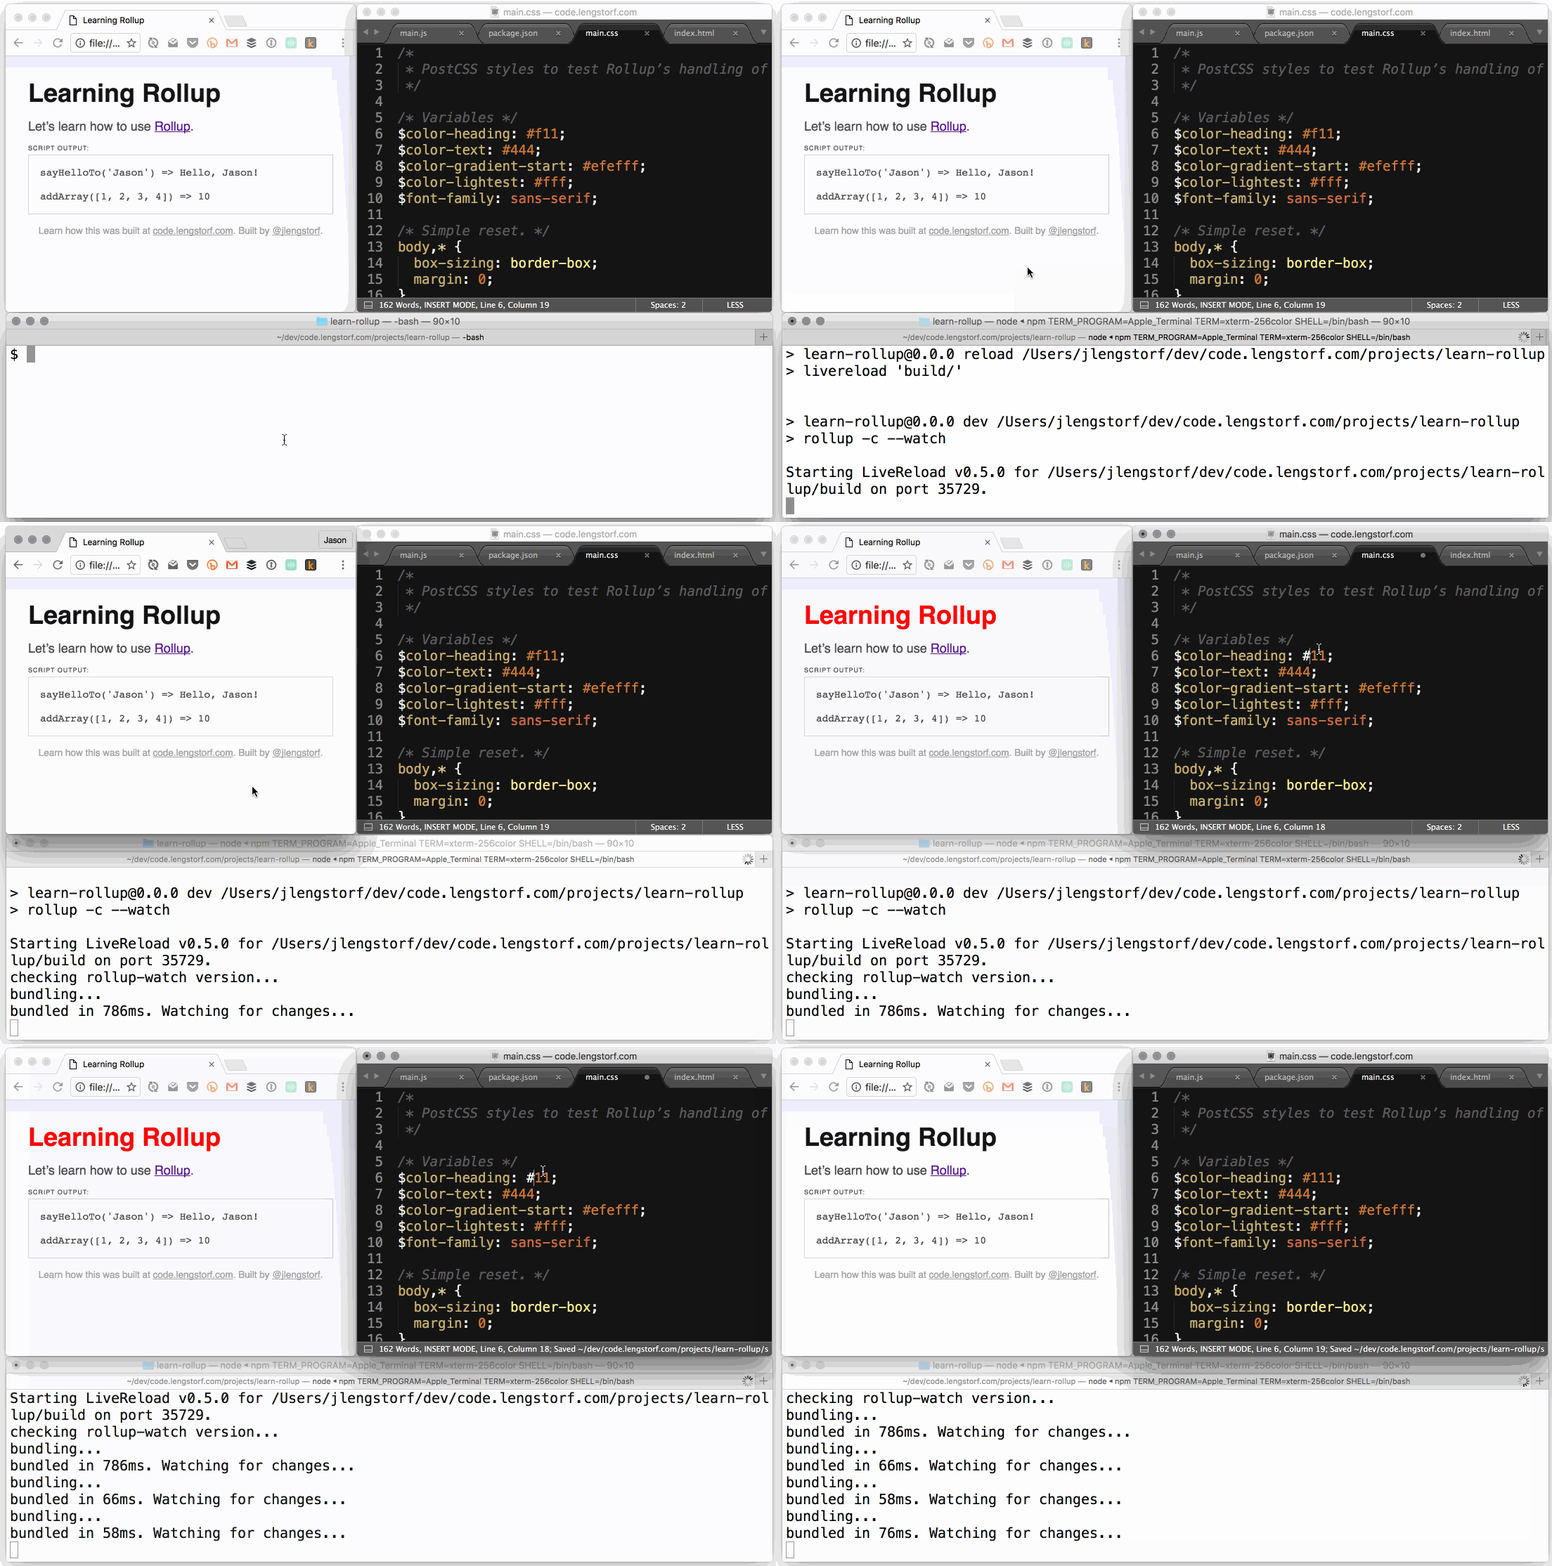
npm run watchThen reload your browser, make a change in the CSS or JS, and watch the browser refresh with the updated bundle — all like magic!

We’re now Rollup masters. Our code bundles will be smaller and faster, and our development process will be painless and quick.
Further Reading
Footnotes
-
I say “dangerous” because the logical features of LESS/Sass always felt a little flimsy to me, and in discussions with people they were always a sticking point. That was a red flag: using them introduced a kind of brittleness in a stylesheet, and while one person may be perfectly clear on what’s going on, the rest of the team may feel like mixins are voodoo pixie magic — and that’s never good for maintainability. ↩